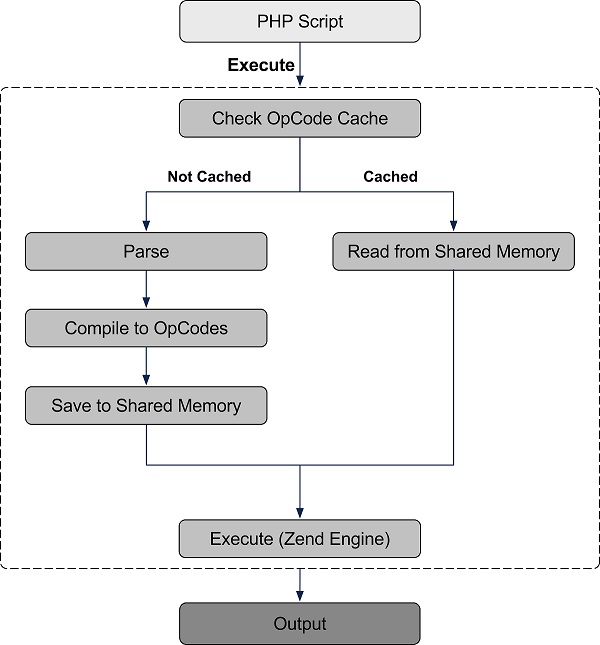
نحوه کارکرد opcache در عکس زیر قابل مشاهده است
# Install "pecl" via php-pear
$ sudo apt-get install -y php-pear
# Install build dependencies
$ sudo apt-get install -y build-essential php5-dev
# Install Zend OpCache
$ sudo pecl install zendopcache-۷.۰.۲
Configure
Now that it’s installed, we need to set up its configuration. Ubuntu (and Debian?) has a convention to put all conf files in /etc/php5/conf.d, which are symlinked from /etc/php5/mods-available. Here’s how to set that up:
First, find the location of opcache.so:
$ sudo find / -name 'opcache.so'
/usr/lib/php5/۲۰۱۰۰۵۲۵/opcache.so # On my server with php 5.4
Once you have the location, you can add that to the conf file for opcache:
# Create & edit the following files:
$ sudo vim /etc/php5/mods-available/opcache.ini
# Add the following to opcache.ini
zend_extension=/usr/lib/php5/۲۰۱۰۰۵۲۵/opcache.so # File path from above
opcache.memory_consumption=۱۲۸
opcache.interned_strings_buffer=۸
opcache.max_accelerated_files=۴۰۰۰
opcache.revalidate_freq=۶۰
opcache.fast_shutdown=۱
opcache.enable_cli=۱
In case your application (or the framework it is built on) only uses annotations at development time, you can achieve even better performance by adding
opcache.save_comments=0in your PHP configuration file as well.
Now that the INI file is created, symlink it to its proper place:
$ sudo ln -s ../mods-available/opcache.ini ۲۰-opcache.iniLastly, I happen to be running php5-fpm with Nginx, so I need to restart the PHP service for the changes to take effect:
$ sudo service php5-fpm restart
# Alternatively: /etc/init.d/php5-fpm restart
If you’re running PHP in Apache, just give that a restart:
$ sudo service apache2 restart
# Alternatively: /etc/init.d/apache2 restart
Confirm Installed
To confirm it’s installed, run php -v, and you should get some information about Zend OpCache being installed:
$ php -v
PHP ۵.۴.۱۷RC1 (cli) (built: Jun ۲۲ ۲۰۱۳ ۱۹:۲۷:۲۶)
Copyright (c) ۱۹۹۷-۲۰۱۳ The PHP Group
Zend Engine v2.۴.۰, Copyright (c) ۱۹۹۸-۲۰۱۳ Zend Technologies
    with Zend OPcache v7.۰.۲, Copyright (c) ۱۹۹۹-۲۰۱۳, by Zend Technologies
Cleaning up
In production, you may not want the build dependencies hanging around. You can rid of the ones installed above by running:
$ sudo apt-get remove --purge build-essential php5-devExample Improvement!
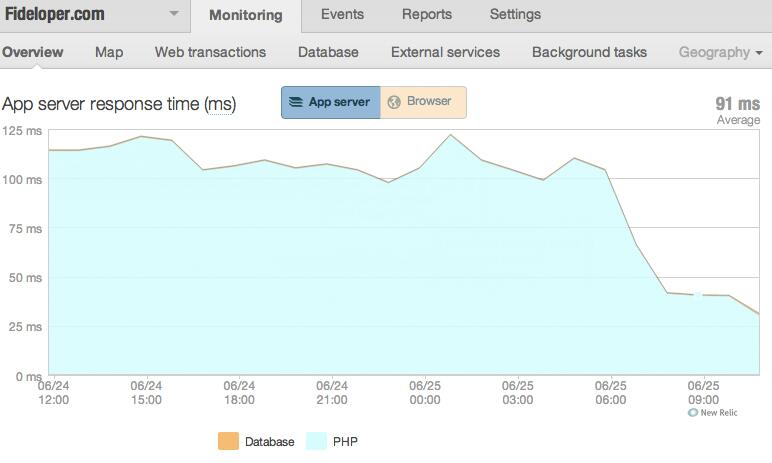
Here’s what happened here after installing Zend OpCache on the fideloper.com server: